Idea for this article came, as few other before this one, from an interesting discussion on one of the online Salesforce communities. I realised, that not everyone is looking for deeply technical explanation of SSJS based consent management, or building cross cloud LWCs. Sometimes it is what might seem trivial, which provides more value to some of the less experienced Trailblazers out there. This is why I have compiled this overview of how to track the engagement throughout the funnel – all the way from building your audience, and towards converting or abandoning your cart.
In case you have come here to find information about website tracking with Marketing Cloud, while this topic is slightly related, you might want to read about how to do this, in my other article about Behaviour based segmentation with Einstein.
Tracking options
You might already be familiar with how Marketing Cloud is tracking opens and clicks. You might also have seen utm parameters added to the tracked URLs. But why do we need both, and how are they working in unison? Both click tracking and UTM are needed in combination, when you want to understand your audience. Let me explain.
Imagine you have a sendable data extension with 10.000 contacts. You want to understand how they behave from here. To better illustrate this, I made this funnel:
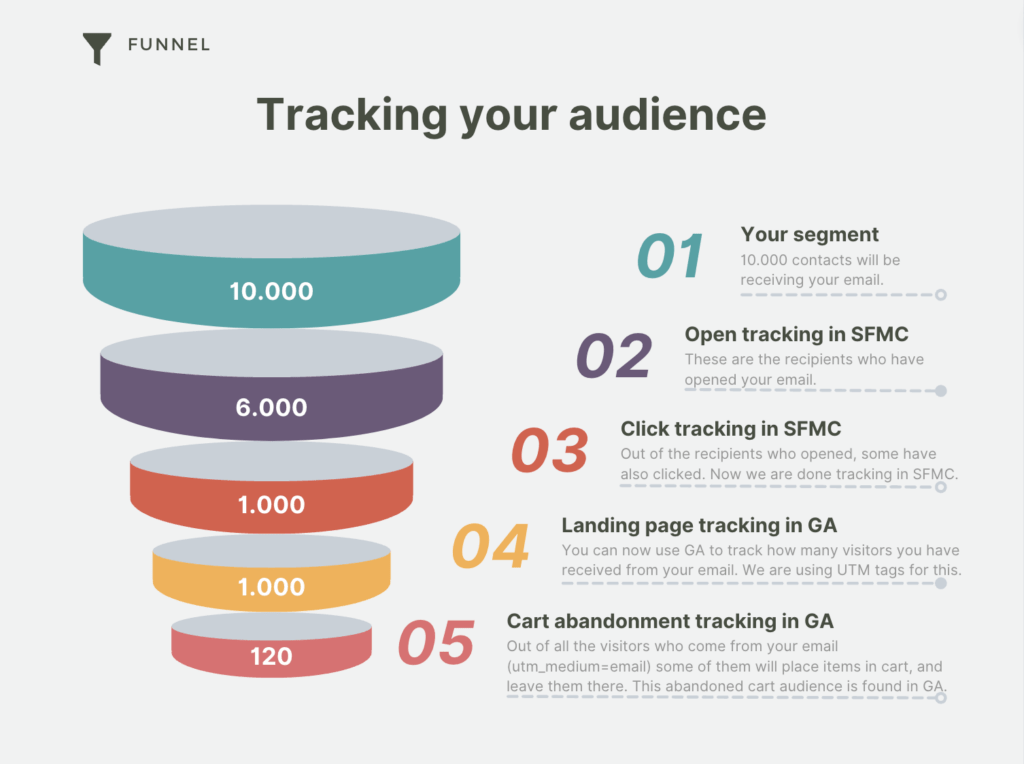
- As you can see, we begin with 10.000 recipients. These are all the contacts in your segment, who will be receiving your email, aka your audience size. You can see all these in the UI in e.g. Journey Builder, or by querying _sent data view.
- Some of these recipients will bounce (hard or soft) and will not receive the email. Let’s for the sake of simplicity leave this step out for now. Some of the recipients will open your email. This is tracked by a small invisible tracking pixel embedded in the email. Keep in mind, that due to privacy measures implemented by increasing number of ISPs these open metrics are becoming less and less reliable. E.g. open rates for recipients with Apple inboxes will be close to 100%. Don’t assume this is the accurate number. Still – open rate will give you an indication of how many found your subject line sufficiently interesting to start reading the entire email. This metric is also available in SFMC UI as well as in _open data view.
- Not all openers are clickers. So in step 3, some will just close the email, few unsubscribe, while others are intrigued by your CTAs, and click one of them. This tracking is not as “skewed” as open tracking, as it requires an actual click on a link, where the subscriber is quickly redirected to the actual destination. Click rate is the number of recipients who click on one or more links. Again, this is also tracked by SFMC and can be found in UI as well as in _click data view.
- Now, your subscriber has found himself on the landing page to which the tracked link has taken him. SFMC is now no longer tracking the behaviour. However UTM parameters are essential in order to identify that this specific website visitor:
- came from an email (utm_medium=email)
- sent by Marketing Cloud (utm_source=sfmc)
- clicked a link (utm_content=cta_main)
- in an email sent as part of the January Sale campaign (utm_campaign=jan_sale_24)
- Tracking is now undertaken by Google Analytics, and you can filter all the page views, events, etc based on the utm parameters which were added by SFMC to the tracking link, using Web Analytics Connector (which is now called Parameter Manager).
- Assuming you have created add-to-cart and conversion events in your website-to-GA integration (which is outside of this scope) you will be able to find out how many visitors to your website placed items in the cart without purchasing them. You can then filter them by their UTM parameters, to identify those coming from your email campaign. This will leave you with the segment size of 120, out of your entire audience – as the rest have dropped off in higher funnel stages.
Deeper Conversion Tracking with Email Studio
Although Marketing Cloud hands off tracking to Google Analytics at the landing page stage (via UTM parameters), Email Studio itself can also provide a deeper layer of conversion tracking. This feature, often referred to as “Conversions Tracking” within Email Studio, allows you to:
- Identify Subscribers Post-Click
Append additional parameters to your email links (i.e.,job_id,subscriber_id,list_id). You can then pass these parameters to your website to match a user’s on-site actions back to a specific SFMC subscriber. - Capture On-Site Activities
By placing a conversion tracking image tag or snippet on your final “thank you” or purchase page, Email Studio can be informed of a successful transaction (or other event). The result is that the conversion data (e.g., transaction amount, products purchased) shows up alongside the traditional open/click data in Email Studio’s reporting. - Compare to Google Analytics
With Email Studio’s conversion tracking, you see exactly which email drives direct revenue or other outcomes in SFMC. Meanwhile, UTM-based Google Analytics reporting lets you see the broader site behavior and multiple sessions. Combining both ensures you don’t miss anything.
Side-by-Side Comparison: Email Studio Conversion Tracking vs. Google Analytics
Email Studio Conversion Tracking
- What it Measures: Actual “downstream” actions (e.g., purchases, registrations) tied to specific sends and subscribers.
- Key Mechanics: Uses appended parameters (
job_id,subscriber_id) and acode snippet on your site to signal back to SFMC. - Primary Benefit: Displays conversions (and even revenue) next to open/click metrics in Email Studio (allowing you to cover the entire funnel).
- Data Attribution: Tied precisely to the subscriber in SFMC (requires capturing those parameters on your website) – but only as last-touch attribution.
Google Analytics
- What it Measures: Web sessions, page views, and events from all traffic sources (including email).
- Key Mechanics: Relies on UTM parameters (e.g.,
utm_source=sfmc), which identify traffic origin but do not intrinsically show this in a context of specific SFMC subscriber ID. - Primary Benefit: Offers robust site-level analytics, funnel tracking, multi-session metrics, and broader marketing insights.
- Data Attribution: Tied to anonymous cookies, which can represent multiple sessions over time from the same user, allowing you to adjust attribution model.
Using both together is often the best approach – Email Studio Conversion Tracking for direct subscriber-level ROI insights in SFMC, and Google Analytics for a comprehensive view of all site behavior and aggregated conversions. Since Email Studio Conversion Tracking is a quite antiquated solution, it’s usage is not very widespread, with most SFMC customers relying purely on GA tracking.
Editing UTM Parameters
If you have integrated your Marketing Cloud with Google Analytics, you will be able to adjust basic settings in the tracking attributes, as most of these are fixed. Where you have the option to set utm_campaign per message, you can use the same campaign name in multiple emails, as you will otherwise be using email name as campaign parameter (not recommended).
Classic Web Analytics Connector
If you are using the more “classic” Web Analytics Connector (in case you haven’t integrated SFMC with GA) you will have significantly more freedom in editing the query parameters, as they are all editable as one single string:
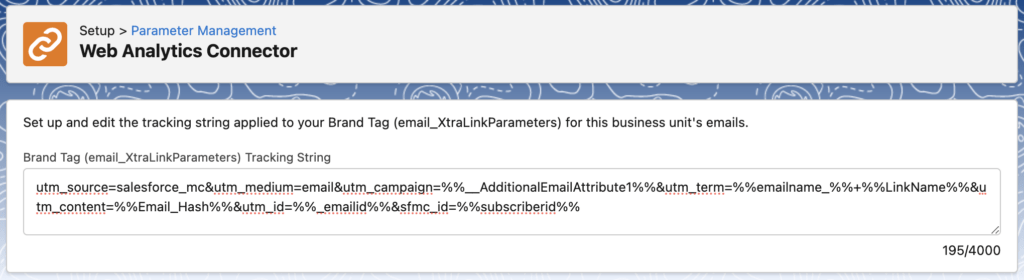
You can freely use ampscript and most personalisation strings in the editor. Below example checks if Additional email attribute 1 is set, and if not – utm_campaign will be populated with email name:
utm_source=salesforce_mc&utm_medium=email&utm_campaign=%%=IIF(EMPTY(_AdditionalEmailAttribute1),emailname_,_AdditionalEmailAttribute1)=%%&utm_term=%%emailname%%+%%LinkName%%&utm_content=%%Email_Hash%%&utm_id=%%_emailid%%&sfmc_id=%%subscriberid%%But what is this mystical _AdditionalEmailAttribute1? You can have up to 5 additional email attributes in use, when building the above tracking string. These will become available as input fields in email send configuration in Journey Builder or Email Studio:
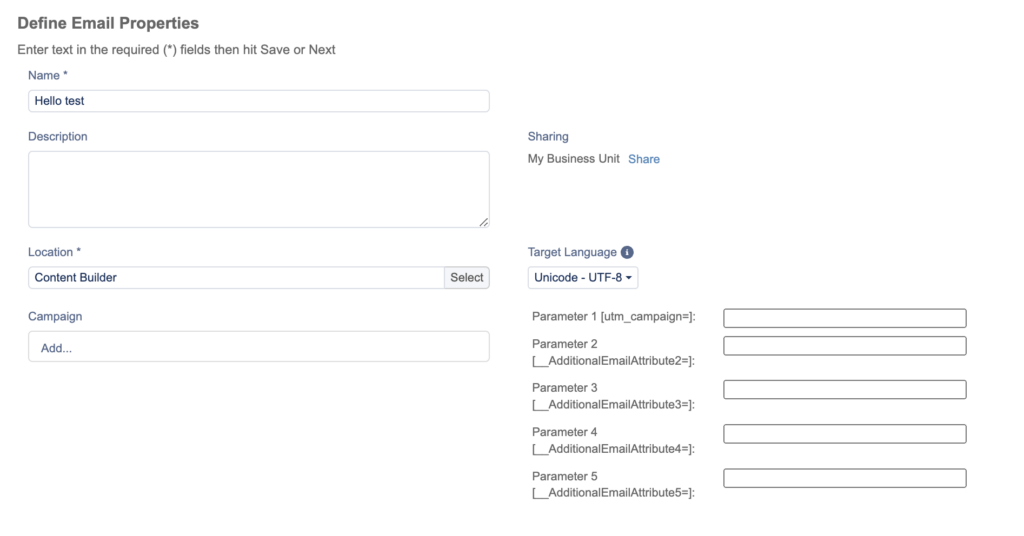
If you are using any of the additional email attributes in your WAC string, they will refer the actual parameter name they are being used in, like in the above example – Parameter 1 is shown next to utm_campaign.
Viewing Google Analytics data in Marketing Cloud
If you have integrated your Google Analytics with Salesforce Marketing Cloud, as described in this guide, you will also benefit from being able to have a unified view across both metrics tracked in SFMC, as well as in Google Analytics on the same page of a journey in Marketing Cloud Journey Builder:
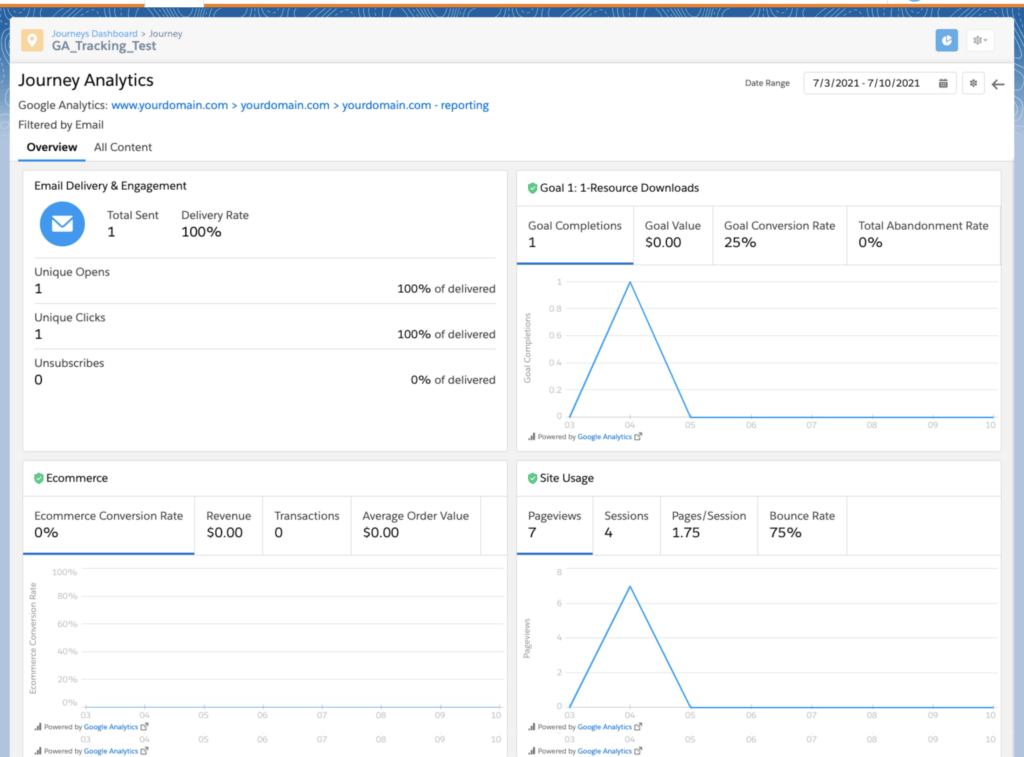
You can select from the various metrics and conversions configured in your GA account, to be displayed in this dashboard. Thanks to the additional query parameters (which are added after the standard utm parameters explained above) it is possible to isolate traffic measured in GA to only the visits originating from that specific journey.
This is possible since SFMC ia passing additional information to GA in some custom URL parameters:
- utm_id – Used to link activity within a campaign. Set by the Marketing Cloud to link activity across Journeys.
- sfmc_id – Salesforce Marketing Cloud IDs are appended to outgoing messages and are recognized by Google Analytics as the ‘Salesforce ID’ Named Custom Dimension. These IDs are the recipient’s Contact ID (identical to and also known as Subscriber ID) from the current Marketing Cloud Tenant.
- sfmc_activityid – Activity IDs are appended to outgoing messages sent from a journey and are recognized by Google Analytics as a Custom Dimension named Activity ID. These IDs allow you to view activity level reporting in Journey Builder.
As you can see, we will be passing the Contact ID to GA, allowing us to map the specific individual to web behaviour. This does not mean that we are able to do e.g. abandoned cart retargeting of an individual – you can use this mapping to activate audiences from Google Analytics in Journey Builder but there are minimum requirements to the size of the audience to protect the privacy of an individual.