Have you ever created an email where you have tens of different offers in separate dynamic content blocks and wondered how you would report back the click data from the blocks? Are you using Ampscript to present highly individualised emails, and lost track of your click rates for those particular offers? Then Impression Region tracking is the right solution to stay on top of your engagement data.

Why should I use impression tracking?
One should use Impression Regions for keeping track on dynamic content in highly data driven emails. When either using dynamic content block or coding your own sophisticated logic directly in Ampscript, it is essential to know what content was actually included in the email and whether it was engaged with. This is what Impression Region is for.
A use case could be an area in your email, which is shown conditionally based on the age and loyalty tier of your recipient, potentially resulting in 20+ possible combination. Especially is multiple dynamic content blocks or ampscript logic is used in a single email, it can be difficult to predict who is receiving what content. Imagine you see low click numbers for a specific CTA in your email. However this is only included in certain conditions, and hence not to all recipients. To find out how many, and which recipients, received an email with that CTA, you must use Impression Regions to keep track on that.
How do I implement impression tracking?
When using the standard dynamic content block, the tags for impression region tracking are set automatically, but you need to set them yourself if working with Ampscript, using BeginImpressionRegion function:
%%[ IF (@ageTier == "20-29" and @loyaltyLevel == "Gold" THEN ]%%
%%=BeginImpressionRegion("Something_specific_for_you")=%%
Here is some content only some of the recipients are getting to see.
%%=EndImpressionRegion(0)=%%
%%[ ENDIF ]%%
In the above example, if you don’t math the criteria in IF statement, you will not get to see the content, and the impression region will not be triggered. If you match the criteria, your recipient will be included in the tracking extract with impression regions, in the context of this particular sendout, having “Something_specific_for_you” registered there.
When closing an impression region with EndImpressionRegion() function, it is not required to pass any parameters to the function call. It does support a single parameter which cis a boolean. It defines the scope of regions closed by the function. A value of True/1 closes all previous Impression Regions:%%=EndImpressionRegion(1)=%%A value of False/0 closes only the preceding Impression Region: %%=EndImpressionRegion(0)=%%The default value, when no parameters are added to the call, is false.
Please be aware, that BeginImpressionRegion() function only supports static values for the region name. However you can use the workaround below, if your name needs to be set dynamically:
%%=TreatAsContent(concat("%","%=BeginImpressionRegion('",@blockName,"')=%","%"))=%%If you are using SSJS instead of Ampscript, you can also use the equivalent of these functions, BeginImpressionRegion and EndImpressionRegion:
<script runat="server>
     Platform.Function.BeginImpressionRegion("mainBlock");
     var content = Platform.Function.ContentArea("123456");
     var moreContent = Platform.Function.ContentArea("789");
     Platform.Function.EndImpressionRegion("mainBlock");
</script>
In case you are using Dynamic Content block, the impression region name will be taken automatically from a combination of the rule and the name of the content block you are referencing in your dynamic content:
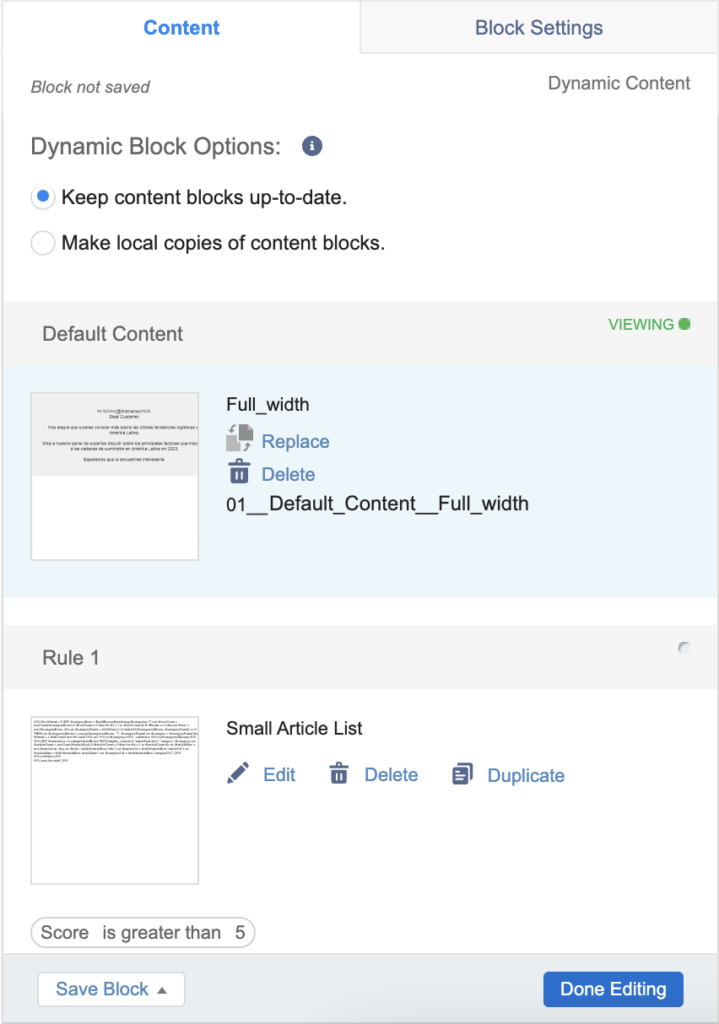
This can be validated by viewing the source code generated by the Dynamic Content block above:
%%[IF ((NOT IsNull([Score]) AND [Score] > "5")) THEN]%%
%%=BeginImpressionRegion("01__Rule_1__Small_Article_List")=%%
%%=ContentBlockById("289791")=%%
%%=EndImpressionRegion()=%%
%%[ELSE]%%
%%=BeginImpressionRegion("01__Default_Content__Full_width")=%%
%%=ContentBlockById("294778")=%%
%%=EndImpressionRegion()=%%
%%[ENDIF]%%
You can overrule the default naming convention, by clicking on the “pencil”:

Replace the rule name by clicking on e.g. Default Content
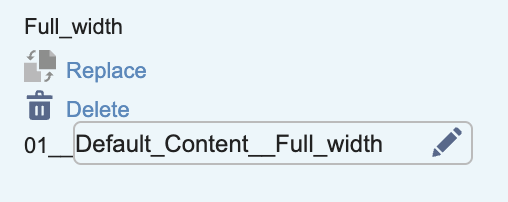
Replace the block name by clicking on the name of the impression region.
One last way of defining impression region is by using ContentBlockByKey function in SSJS. Here you can provide impression region name as one pf the parameters:
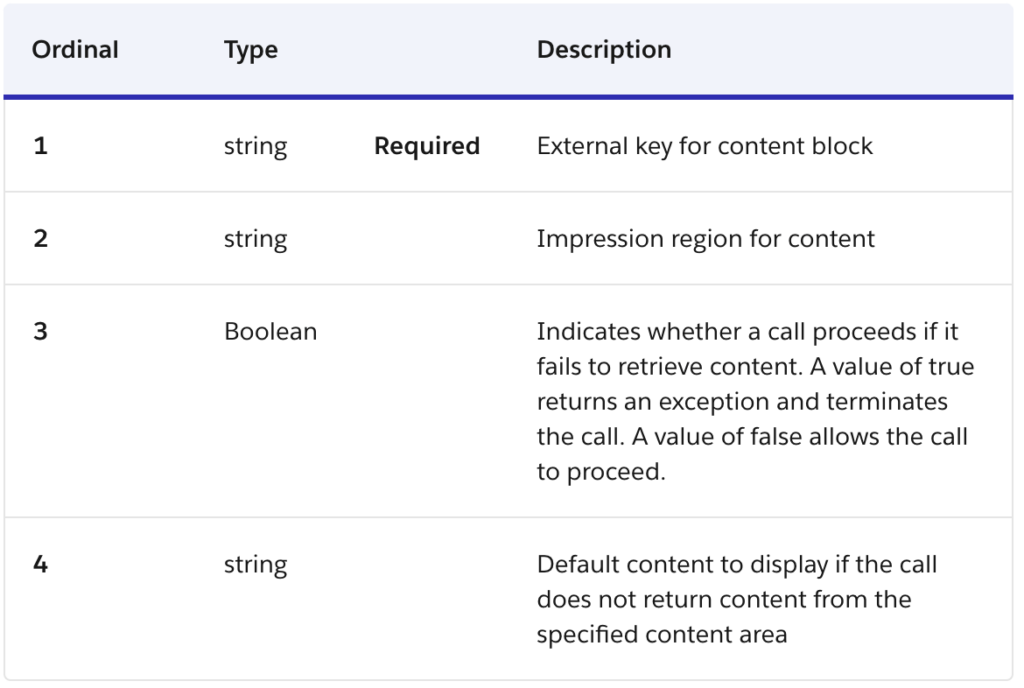
This will fetch and display a content block, which is wrapped in Impression Region with the name defined in your second parameter.
Where do I view impression tracking?
There are two ways of viewing results of the impression regions: reports and tracking extract.
- Navigate to Email Studio > Tracking > Reports
- Under Tracking Reports, you get the options of “Impression Tracking by Job” or “Impression Tracking for Triggered Sends” – depending on your send method.

Running the Impression Tracking by Job report provides you with following metrics:
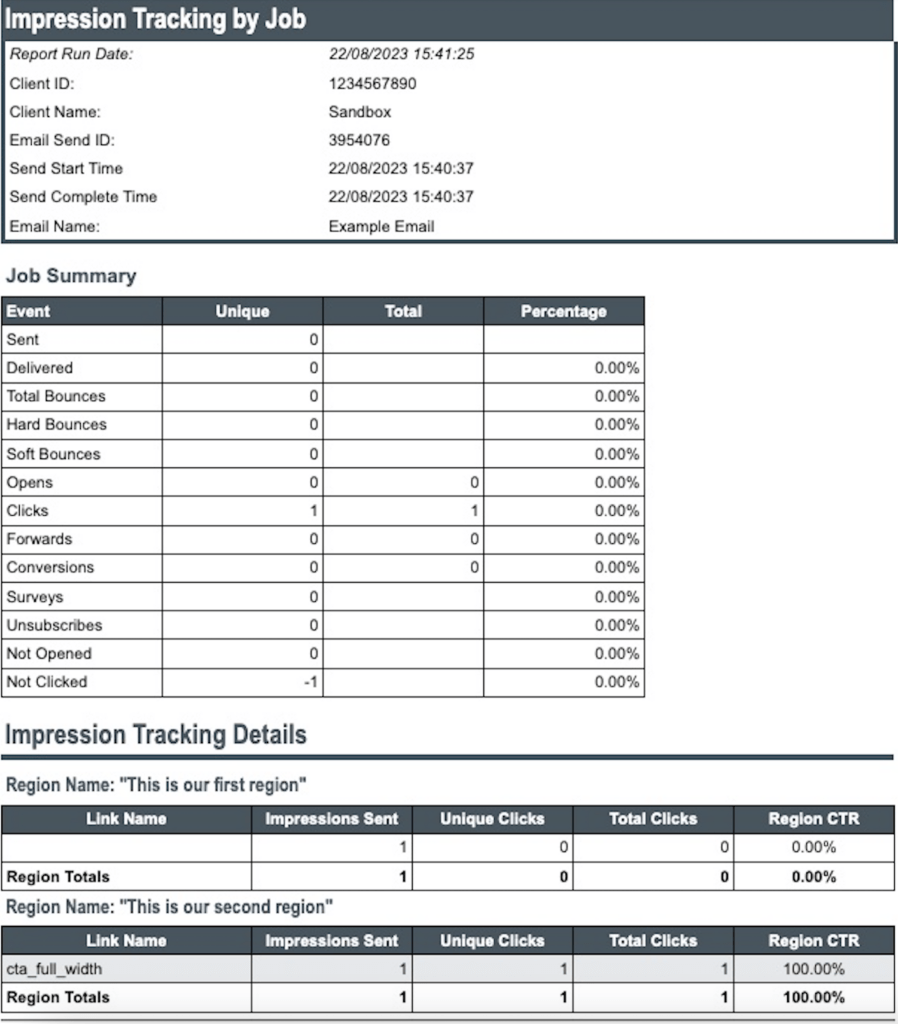
As you can see, we have some overall job metrics, but we can also see how many of each impression region have been sent out, as well as the engagement with links within that particular region. This will allow you to be more precise, compared to just look at the overall CTR of your email.
There are also two other reports, covering more long term performance of your impression regions:
- Region Performance Over Time
The Region Performance Over Time report shows how a single section of content performs over a period across multiple sends. You can use this report to see how a specific link is performing over a certain period. Only emails that contain dynamic content or AMPscript can be tracked in this report. - Region Performance for Triggered Sends Over Time
This report shows how a single section of content performs over time across multiple jobs in Triggered Emails.
These are quite OK reports, if the number of impression regions is limited. However for large enterprise solutions, with almost countless combinations of impression regions across large number of emails, they come short. Instead you should utilise an external BI tool, like PowerBI or similar to analyse large raw datasets. These can be obtained by running Tracking Extract in Automation Studio, and provide your with more detailed (subscriber specific) metrics on who has received which impression regions in that individual sends over a period of time. You will see following metric in the extract files:
- SendImpression
The SendImpression event extract file shows instances of an email send occurring during a specified date range. Unlike the standardSentfile, which has one row per subscriber, this file provides a granular view of every impression region rendered for each individual.- Reporting Angle: This is the source of truth for “Who was sent what.” If your email uses multiple dynamic blocks, this file records exactly which specific blocks were served to each subscriber.
- SendJobImpression
The SendJobImpression file represents the metadata for all impression tracking information from processed jobs. It serves as a dictionary or a summary of the impression regions utilized within a specific send.- Reporting Angle: Use this file to audit your dynamic content logic. It allows you to see a list of all unique regions that were actually triggered during a send, regardless of which individual received them. It helps identify if a region you coded was never actually sent to anyone.
- ClickImpression
The ClickImpression extract file is the most valuable for engagement attribution. It shows every instance of a clicked link while explicitly tagging it with the Impression Region name where the link was located.- Reporting Angle: This file answers the question, “Which dynamic offer actually drove the conversion?” If you have the same generic “Order Now” button in three different dynamic regions, the standard
Clicksfile cannot distinguish between them. TheClickImpressionfile bridges this gap by attributing the click to theImpressionRegionName.
- Reporting Angle: This file answers the question, “Which dynamic offer actually drove the conversion?” If you have the same generic “Order Now” button in three different dynamic regions, the standard
Mastering Tracking Extracts for subscriber-level attribution
To reconstruct the subscriber engagement, you must link several specific extract files. The SendID (Job ID) and SubscriberKey are the primary links between your campaign metadata and the individual engagement events:
| File 1 | File 2 | Join Key(s) | Description |
| SendJobs | Sent | SendID | Links campaign metadata (Email Name, Subject) to individual subscriber events. |
| Sent | SendImpression | SendID, SubscriberKey, BatchID | An extension of the Sent file, adding the context of which Impression Region was served. |
| Clicks | ClickImpression | SendID, SubscriberKey, URLID | Links a standard click to the specific Impression Region it occurred within. |
| SendJobs | SendJobImpression | SendID | Provides a summary of all unique regions defined within a specific Job. |
By joining these files, you can create a detailed report showing the lifecycle of a dynamic email. Below is an example of what this data looks like once combined:
| SubscriberKey | Email Name | Region Sent | Sent Date | Opened Date | Clicked Date | Region Clicked |
| 00Qd…ZEAQ | Dynamic_Promo_Feb | Fallback_selection | 2026-02-17 09:34:34 | 2026-02-17 09:34:36 | N/A | N/A |
| 00Qd…FEAU | Dynamic_Promo_Feb | Special_selection | 2026-02-17 09:34:34 | 2026-02-17 09:34:38 | N/A | N/A |
| 00Qd…HEAU | Dynamic_Promo_Feb | Special_selection | 2026-02-17 09:42:39 | 2026-02-17 09:52:59 | 2026-02-17 09:53:07 | Special_selection |
How to interpret these results:
- Validation: You can see that subscribers
FEAUandHEAUcorrectly received the “Special_selection” logic. - Conversion Attribution: In the third row, the subscriber received the “Special_selection” region and clicked within it. If your email has the same “Shop Now” button in multiple regions, the
ClickImpressionfile is the only way to know which specific offer drove the click. - Content Gap Analysis: If you see subscribers being sent the “Fallback_selection” (as seen with
ZEAQ), you can audit your data to see if they should have qualified for a more targeted region.
Technical takeaways for reporting
- Sent vs. SendImpression: The
Sentfile records one row per subscriber. TheSendImpressionfile records one row per region per subscriber. If an email has 5 regions, one person will have 1Sentrow but 5SendImpressionrows. - The URLID Link: When joining clicks, always include the
URLIDorSendURLID(along with the alias). This ensures that if a user clicks multiple different links, you attribute the correct link to the correct region. - Scale: Use an ETL process to move these extracts into a data warehouse (via SFTP, AWS S3, Azure Blob Storage or Google Cloud Storage) where you can pre-calculate the “Region Click-Through Rate” (Clicks in Region / Impressions of Region).
By moving beyond standard reports and utilizing tracking extracts, you transform Impression Tracking from a simple monitoring tool into a powerful engine for content optimization and personalization ROI.